
Implementing an OAuth2 client in rails is a simple task due to gems like omniauth and devise. They do the heavy work implementing the core of the OAuth2 protocol. But what is going on under the hood? Lets take a look at how they implement the OAuth protocol.
The OAuth protocol
In a third party authentication scenario, we have two entities that don’t trust each other and rely on a third party entity to provide the trust bond.
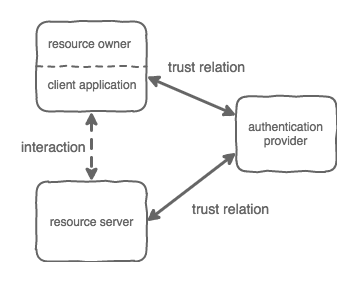
The client application, acting on behalf of the resource owner, wants to access a resource on a server. The resource server doesn’t trust the client application, but both trust the authentication provider that will vouch for the user identity.
OAuth supports different types of workflows. The Authorization Code Grant type is the most commonly used since it is optimized to take advantage of the redirect capabilities of a web browser.
In this scenario, the client application is the browser, the resource owner is the user using the browser, the resource server is the site that he is visiting and the authentication provider is an external OAuth provider (e.g. facebook, google, our own OAuth service)
Before we start
The first step to use an authentication provider is to create a bond of trust between the resource server and the authentication server. This usually means that the resource server needs to be registered as an app in the authentication provider.
I will not cover this process here, you can find plenty of information on how to set up an app on the documentation for your chosen provider.
After this process, a CLIENT_ID and CLIENT_SECRET will be created. These are used by the resource server to authenticate himself on the authentication provider. Another common requirement when configuring the app is to register the url of the endpoint on the resource server to where the authentication provider will redirect the client.
The next step is to install and configure the omniauth gem. The devise gem has a integration with omniauth and is a common choice if you are building a rails application.
The installation process is not covered here. I assume you have followed the instructions provided by the gem documentation. https://github.com/plataformatec/devise/wiki/OmniAuth:-Overview
Some aspects of the OAuth protocol depend on the provider that we are using. To adapt to these differences, omniauth uses the strategy pattern. You will find gems to implement strategies for all the common providers. You can implement your own if you are using a custom provider.
As an example, I will use the omniauth gem with the omniauth-google-oauth2 strategy together with the devise gem to authenticate the User model. For this example, we will assume our resource server can be reached athttps://resource-server.com.
OAuth in action
The omniauth gem implements the OAuth Authorization Code Grant. This uses the browser redirect capabilities to drive the user through the authentication workflow.
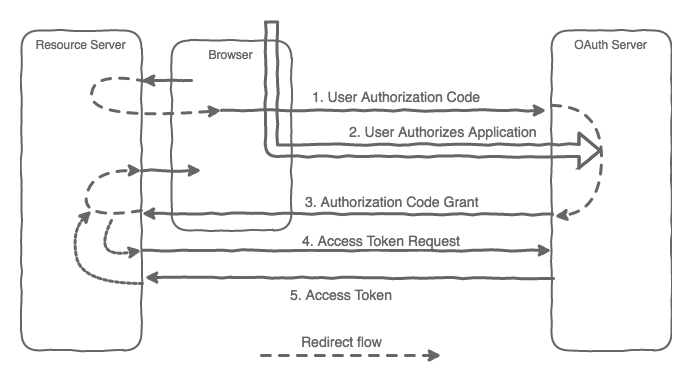
1. User authorization code
The authentication process starts when a request is made through the entry point route — in our example,https://resource-server.com/users/auth/google_oauth2. Devise provides this route by default, where its name is based on the model and strategy names.
This is will start the redirect flow by redirecting to the OAuth provider. The url will depend on the provider used. For my example, and since I’m using the Google OAuth provider, it’s https://accounts.google.com.
https://accounts.google.com/o/oauth2/auth?access_type=offline&client_id=CLIENT_ID&redirect_uri=https://resource-server.com /users/auth/google_oauth2/callback &response_type=code&scope=email+profile&state=e11bb993d9cc2137f2144f77eac5ce3c4748626bccf20cb4Some parameters are passed to the OAuth provider on this call:
The response_type identifies the type of flow being requested. It needs to be “code” with the Authorization Code Grant flow.
The client_id that identifies the caller app. This was obtained during the app registration.
The scope represents what the resource server is requesting access to from the OAuth provider.
The redirect_url to be used during the Authorization code grant step. In our example the entry point is https://resource-server.com/users/auth/google_oauth2/callback. Once again, the route is provided by the devise gem.
The state is an optional parameter that, if passed, is returned by the OAuth provider during the redirect step.
2. User authorizes the application
During this step, the provider will check the user identity. This is specific to each provider and is usually done by asking for the user’s credentials.
3. Authorization Code Grant
If the user authorizes the application, the OAuth provider redirects the browser to the redirect_url passing the AUTHORIZATION_CODE together with the state parameter if requested.
https://resource-server.com /users/auth/google_oauth2/callback?code=AUTHORIZATION_CODE& state=e11bb993d9cc2137f2144f77eac5ce3c4748626bccf20cb4The resource server now has the AUTHORIZATION_CODE. Before the redirect flow may proceed, the resource server needs to fetch the user information from the OAuth provider.
4. Access Token Request
To access the OAuth provider and get the user information we need to exchange the AUTHORIZATON_CODE for an ACCESS_TOKEN.
The resource server will make a request to the OAuth provider passing the authorization_code, client_id, client_secret and redirect_uri as parameters.
https:// accounts.google.com/o/oauth2/token ?client_id=CLIENT_ID&client_secret=CLIENT_SECRET&grant_type=authorization_code&code=AUTHORIZATION_CODE&redirect_uri=CALLBACK_URLThe oAuth provider will check each one of them as part of the validation process.
5. Access Token
If the information provided on the previous step is correct, the OAuth provider will respond with the access token.
The access token is used to request further information to the OAuth provider. Usually the requested information is returned along with the access token to avoid further requests. How this information is structured will depend on the OAuth provider. This information is processed by the strategy and made available on the request as request.env['omniauth.auth'].
You need to implement the action that will process this information by extending the Devise::OmniauthCallbacksController. The action will have the same name as your strategy.
On this action, you need to take the steps required to create the user session. At this point, the redirect workflow will continue. With a session created the request is returned to the client so it may redirect again to the final resource.
The omniauth gem together with the devise gem makes it very easy to implement an OAuth client, but sometimes, when things go wrong, it’s hard to trail the workflow. I hope this detailed analysis and in-depth look at the authentication flow will be helpful for when you might need to check under the hood.
Useful links:
RFC 6749 - The OAuth 2.0 Authorization FrameworkInternet Engineering Task Force (IETF) D. Hardt, Ed. Request for Comments: 6749 Microsoft Obsoletes: 5849 October 2012…tools.ietf.orgI’m part of the Runtime Revolution team focusing on building and maintaining large scale Ruby on Rails applications.
Runtime RevolutionWe are Rails, mobile and product development experts. We can build your product or work with you on your project.runtime-revolution.com