
Creating dynamic and customizable web pages is a cornerstone of modern web development. If you’re building a Django application and want to offer a reliable WYSIWYG editor, GrapesJS is a compelling choice.
GrapesJS is an open-source web builder framework that enables users to design and edit HTML templates visually, with drag-and-drop functionality. Integrating GrapesJS with Django provides users with a more intuitive way to manage and customize content.
Prerequisites
Before diving into the integration, ensure you have the following:
- Python installed (preferably version 3.6 or later).
- Django installed (preferably version 3.2 or later).
- A basic understanding of Python and Django development, including views, templates, and static files.
- A basic understanding of Javascript development.
Render GrapesJS
In this section, we use Django views and templates to render and serve the GrapesJS tool. At the end of the section, you should have a URL that allows you to see the GrapesJS tool and play with it.
Step 1: Install and Set Up Django
Start by creating a Django project and an app to handle the GrapesJS integration.
django-admin startproject project
cd project
python manage.py startapp builder
Add the builder app to your INSTALLED_APPS in settings.py:
INSTALLED_APPS = [
  ...
  'builder',
]
Step 2: Set Up Static Files
We will be making use of static files for GrapesJS. Configure Django to serve static files by adding the following in settings.py:
STATIC_URL = '/static/'
STATICFILES_DIRS = [BASE_DIR / 'static']
Create a static directory in your project root if it doesn’t exist. Inside this directory, create a folder structure for the GrapesJS assets, such as js and css.
Step 3: Download and Include GrapesJS
Download the GrapesJS library or link to its Content Delivery Network (CDN). For simplicity, we’ll use the CDN approach.
Create a templates folder in the project folder. Inside that new folder, create a base.html file. Add GrapesJS to your base.html template like so:
<!DOCTYPE html>
<html lang="en">
<head>
  <meta charset="UTF-8">
  <meta name="viewport" content="width=device-width, initial-scale=1.0">
  <title>GrapesJS Builder</title>
  <link rel="stylesheet" href="https://unpkg.com/grapesjs/dist/css/grapes.min.css">
  {% block css %}{% endblock %}
</head>
<body>
  <script src="https://unpkg.com/grapesjs/dist/grapes.min.js"></script>
  <script src="https://unpkg.com/[email protected]"></script>
  {% block content %}{% endblock %}
</body>
</html>
We will be using the grapesjs-preset-webpage plugin for simplicity. In the settings.py file, change the DIRS variable in the TEMPLATES variable to the following:
import os

...

TEMPLATES = [
  {
    ...
    'DIRS': [os.path.join(BASE_DIR, 'project/templates')],
    ...
  },
]
Step 4: Create the Builder Template
In the builder app, create a templates folder, then create another folder called builder inside that folder. Finally, inside the builder folder, create a file called index.html with this:
{% extends "base.html" %}

{% block content %}
  <div id="editor" style="height: 100%; border: 1px solid #ddd;"></div>
  <script>
    const editor = grapesjs.init({
      container: '#editor',
      fromElement: true,
      width: 'auto',
      height: '1000px',
      storageManager: false,
      panels: { defaults: [] }, // Disable panels if not needed
      plugins: ['grapesjs-preset-webpage'],
      pluginsOpts: {
        'grapesjs-preset-webpage': {
          // options
        }
      }
    });
  </script>
{% endblock %}
Step 5: Set Up the View and Url
Create a view in builder/views.py to render the builder.html template like this:
from django.shortcuts import render


def builder_view(request):
  return render(request, 'builder/index.html')
In builder/urls.py, define the URL pattern for the builder view:
from django.urls import path
from builder import views


urlpatterns = [
  path('/', views.builder_view, name='builder'),
]
Include these new URLs in the project’s urls.py:
from django.contrib import admin
from django.urls import path, include

urlpatterns = [
  path('admin/', admin.site.urls),
  path('builder', include('builder.urls')),
]
Step 6: Test the View
Before testing the view, for reference, here’s the structure of folders and files that you should have:
Go ahead and run migrateand then runserver to launch a local instance:
python manage.py migrate
python manage.py runserver
Open up localhost:8000/builder on your browser and you should see the following screen:
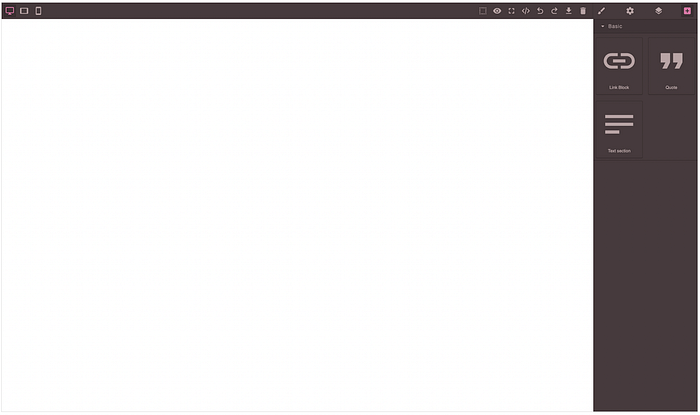
With this, you can drag some components and build a very basic web page. It doesn’t allow you to add images or anything interesting, but that’s beyond the scope of this article. We are only concerned with integrating the tool with Django.
At the moment, we are able to serve a Django view that renders the GrapesJS tool, but we can’t do anything meaningful with it. Yes, we can edit a page and add/edit/remove visual components, but that’s it. In that case, what happens to the page if we reload it? Well, you lose everything because all we have done so far is serve the GrapesJS tool in its most basic setting.
Important note: GrapesJS is merely a page-building tool. It doesn’t offer anything other than tools for building HTML, JS, and CSS. Integrating with a framework like Django implies developing all manners of tooling to allow saving, displaying, creating, and deleting the pages that will be edited by the GrapesJS tool.
Storing GrapesJS Content
Now, we are going to take the code generated by GrapesJS and save it in a database so that we can render these pages.
Step 1: Create a Model to Store the Pages
In the models.py file, add the following model:
from django.db import models

class Page(models.Model):
  title = models.CharField(max_length=50)
  slug = models.SlugField(max_length=50, default="", null=False)
  data = models.JSONField(null=False, blank=True, default=dict)
  html = models.TextField(null=False, blank=True, default="")
  css = models.TextField(null=False, blank=True, default="")
Run the makemigrations command and then the migrate command:
python manage.py makemigrations
python manage.py migrate
Now let’s add the admin code so that you can create and delete pages from the admin page:
from django.contrib import admin
from builder.models import Page
class PageAdmin(admin.ModelAdmin):
prepopulated_fields = {"slug": ("title",)}
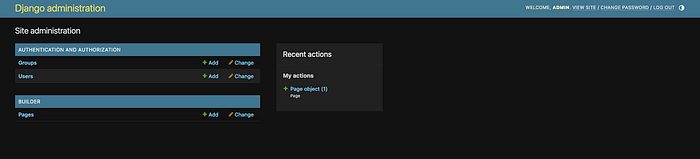
admin.site.register(Page, PageAdmin)Run the runserver command and open up localhost:8000/admin/ on your browser. You should see the following:
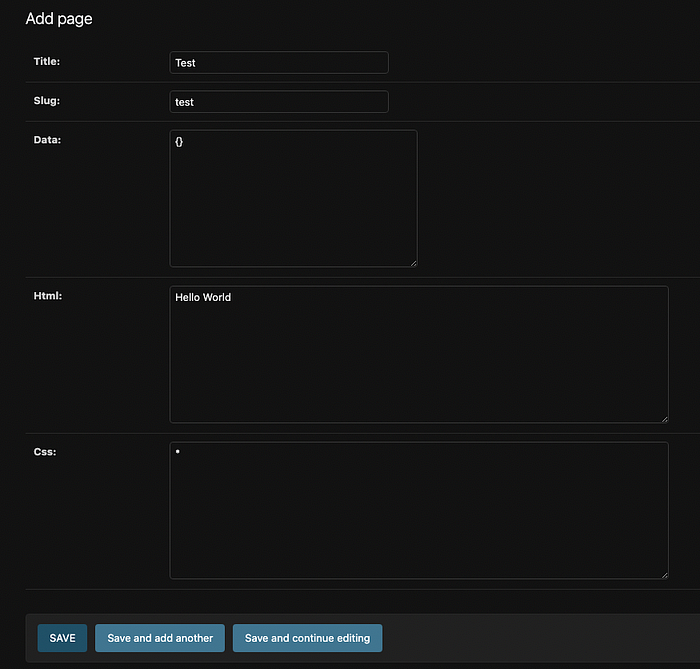
Click the Pages link and add a new Page, give it the following title “Test” (The slug should autofill with “test”). Add the words “Hello World” to the html field, an asterisk (*) to the css field and open/close brackets ({}) to the data field. Press save. This should be the final result.
Step 2: Add a Preview View
To render the page we just created in the database, we are going to create another view and simply fetch that page and render the html and css that is stored in the database. Add another view to the views.py file:
class PageDetailView(DetailView):
  model = Page
  template_name = "builder/detail.html"
  slug_url_kwarg = "slug"
Then add the URL to the urls.py file:
path('/preview/<str:slug>', views.PageDetailView.as_view(), name='preview'),Create a new template file called detail.html in the builder app, under templates/builder/ like so:
{% extends 'base.html' %}
{% if page %}
{% block css %}
<style>
{{ page.css }}
</style>
{% endblock %}
{% block content %}
{{ page.html | safe }}
{% endblock %}
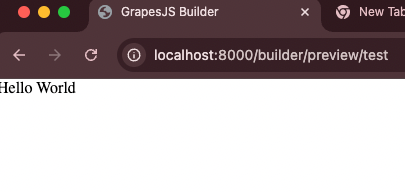
{% endif %}As you can see, we are only taking in the information that is already stored in the database and rendering it in the template. If you visit the following URL, localhost:8000/builder/preview/test, you should see the phrase “Hello World” in the top left corner over a white background.
Step 3: Change the Builder View to Be Per Page
Our current builder view is not associated with a specific page, so let’s change it to associate with a Page model instance. First, transform the builder view to be a DetailView like so:
from django.views.generic import DetailView
from builder.models import Page

class BuilderView(DetailView):
  model = Page
  template_name = "builder/index.html"
  slug_url_kwarg = "slug"
and make sure to change the urls.py file as well to reflect this change by replacing the builder view’s URL with this:
path('/<str:slug>', views.BuilderView.as_view(), name='builder'),Step 4: Save/Load Views
Now, let’s add a view for receiving the GrapesJS data and a view for loading that data.
import json
from django.http import JsonResponse

...

def save(request, id):
  if request.method == "POST":
    body = json.loads(request.body)
    page = Page.objects.get(id=id)
    page.data = body["data"]
    page.html = body["html"]
    page.css = body["css"]
    page.save()
    return JsonResponse({"success": True})

def load(request, id):
  if request.method == "GET":
    page = Page.objects.get(id=id)
    return JsonResponse({"data": page.data})
This should be very straightforward code to understand. You should proof it and improve on it, but this is what matters for the saving and loading feature. Note that the data available in the body["data"] is in JSON format.
Here are the URLs for it:
path('/save/<int:id>', views.save, name='save'),
path('/load/<int:id>', views.load, name='load'),
Step 5: Storage Manager
With the save and load views in place, all we need to do is set up the storage manager on the GrapesJS side. You can add this code to the init function of GrapesJS:
storageManager: {
  type: 'remote',
  autosave: true,
  autoload: true,
  stepsBeforeSave: 1,
  options: {
    remote: {
      headers: {'X-CSRFToken': csrftoken},
      urlLoad: "/builder/load/{{ page.id }}",
      urlStore: "/builder/save/{{ page.id }}",
      onStore: data => {
        html = editor.getHtml();
        css = editor.getCss();
        return { id: {{ page.id }}, data, html, css };
      },
      onLoad: result => {
        return result.data
      },
    }
  }
}
This configuration will save every time you make a change to the page you are editing. So, if you change a piece of text, it’s going to send a request to the URL defined in urlStore.
We override the onStore method to append some extra information to the store URL. In this case, we also want to send the html and css of the page, not just the data structure created by GrapesJS. The html and css content is important for rendering the page and the data content is for editing the page and loading everything back into GrapesJS.
Finally, you can define the csrftoken variable before calling the init function like this:
const csrftoken = document.querySelector('[name=csrfmiddlewaretoken]').value;and by placing the csrf_token template tag in index.html, like this:
{% csrf_token %}Wrapping up
If everything goes smoothly, you can create pages (through the Django admin) and edit them with GrapesJS. This is just the bare minimum of what you can do to integrate GrapesJS with Django. There is plenty that can be improved from here on out, from page management on the Django side to more features and components on GrapesJS.
However, for the scope of this article, the current solution demonstrates how Django can serve content created by GrapesJS in a self-contained environment.