What are Self-Organizing Maps?
Self-Organizing Maps (SOM), also know as Kohonen Networks, in honor of its creator, Teuvo Kohonen, are an extremely popular data visualization technique used in many areas like fraud detection, trade surveillance, customer segmentation, campaign analytics, and many other areas.
Like the name implies, the self-organizing map provides a mapping of data, but what’s its main goal? Many sources of data available to businesses nowadays have more than two or even three dimensions. However, the human brain is usually incapable of understanding the patterns present on high dimensionality data. Its objective is to reduce the number of dimensions so that the human brain can understand and interpret the source data.
Now, how do SOMs handle that reduction of dimensionality? They’re able to do that by producing a usually bidimensional map that groups similar data together. By doing this, SOMs are able to reduce the data dimensionality and group similar data points.
There are many different specializations of SOMs and each one of them is tailored for their individual use cases. But for now, we’ll stay with the original SOM idealized by Kohonen to understand the fundamentals. We’ll focus on two fundamental aspects of the SOM: the components and the algorithm itself.
Components
There are two components when dealing with SOMs: The sample data and the weight vectors.
The sample data is usually the data that we feed to the self-organizing map, and usually contains 3 or more dimensions. One extremely popular sample set when dealing with machine learning is the Irís Data Set. It’s an appropriate set since it has 4 dimensions, more than the 3 dimensions minimum for the SOM.
The weight vectors (usually called neurons, since Self-Organizing Maps are a form of neural networks) are the nodes of the map itself. It is composed of two different kinds of information: its data and its location.
The neuron data corresponds with the sample data and its a representation on the map of the data itself. In the Irís Data Set each node would be a representation of the Irises characteristics. The location of the neuron is usually a 2-dimensional value (x, y) normalized between 0 and 1. We say it’s usually a 2-dimensional value because there exists work using SOMs with only 1-dimension locations.
Algorithm
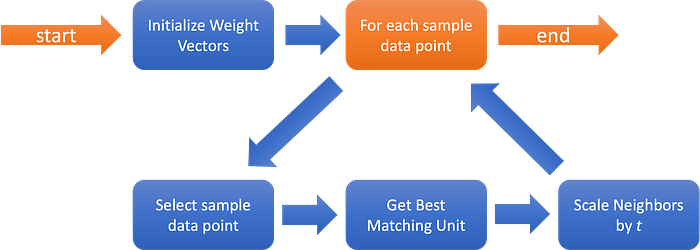
But how are the weight vectors affected by the sample data? The following image ilustrastes the algorithm.
As we can see above, the first step is initializing the weight vectors. The most simple method is by assigning random values to the weight map. We’ll use that method as reference. There’re many other methods that we can use to initialize our map that have their own advantages according to the original source data. Some initialization methods will reduce the effort required to generate a good (meaning sorted) map.
Afterwards, we enter in a loop for each data point on the sample data. After selecting the sample data point, we’ll then proceed to select the Best Matching Unit (BMU). To obtain that BMU, we compare the current sample data point with the data value of each neuron, and the one with the smallest distance is the BMU. We can define distance mathematically in several ways, however, the most common distance when using SOMs is the Euclidean Distance, which we’ll use later on.
After selecting the BMU, we need to update our map. This is the complex part of the algorithm. The first step in doing this is by selecting the neighbors that will be affected, using a neighborhood function. The most common method uses a gaussian function where every point with a value above zero is considered a neighbor. Now, the radius of that neighborhood should decrease over time (t, or the number of iterations the loop has went through). This will allow for each unit (another name for the neurons) to first move to the area where they’ll probably be, and then fine tune the final position.
After identified the neighborhood we’ll move to the actual learning phase. The selected BMU will end up being the focus of the update, and will be changed to be more similar to the sample data vector. Each unit selected by the neighborhood function will then be updated to also be more similar to the selected sample vector, according to the distance from the BMU (this algorithm really likes gaussian functions, right?). The update for both the BMU and the neighbors is also tempered by time (t), reducing the magnitude of the update.
The algorithm then repeats while it has sample data points. Eventually, when 1/t nears zero, the magnitude of the updates induced by each new sample data point will be meaningless, and as such, our map has become stable.
And this is the short version of how a Self-Organizing Map works.
How to use Self-Organizing Maps in Ruby-on-Rails?
All this theory is fine, however, remember what was the title of this article? “Self-Organizing Maps on Ruby On Rails”. This implies that we need to see an implementation of Self-Organizing Maps working on a Ruby-on-Rails server before this article finishes!
The sad part about this is that there’s very limited work on implementing Self-Organizing Maps in Ruby. The only example I could find was this github link. The issue with this implementation for the usage that we’re trying to apply here is that it requires that we’ve the entire dataset available when we start the training (which isn’t abnormal since the original SOM algorithm wasn’t intended for streaming environments — there’s also related work with adapting the SOM algorithm for those kinds of environments, but that’s a topic for another day).
We could also offload the work to a python worker or use something like pycall and use the sklearn-som that way. Unfortunately, we’ve the same issue mentioned before. The original SOM algorithm was always intended to be used as an offline algorithm, and not as a streaming one.
So with these limitations in mind, we’ll implement the architecture on the following image:
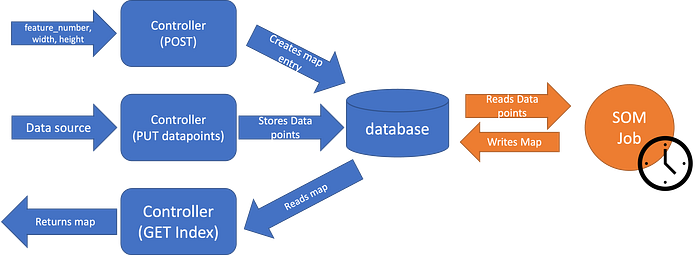
As we can see here, we do the usual HTTP requests, the POST to create a new map (sending the feature count, width and height of the map), the PUT datapoints to write new data points into the database, and the GET index to fetch the most recently generated map. That map is generated periodically by a side job, since the SOM algorithm is heavy enough that running it for each POST request is completely impractical.
On the image above, we can see what we would expect of the database. We’d have a Map table that contains a number with the number of features, width and height of the map and the latest map state. We’d have another table “Sample Data” where we’d store the data points received by the POST endpoint, together with its label (optionally).
And what’s going onto that SOM job? Unfortunately the ruby_som project mentioned before is roughly 9 years old, and it would take us a while to put it up to date with modern ruby. Sklearn also has the advantage of being one of the most used data science libraries when using python. And with gems like pycall, we may be able to access the power of that same library. So, we’ll go with Sklearn and pycall.
Now that we have a general idea of what exactly we want to do how exactly should we proceed to do it?
Implementation
First of all, lets start with a blank ruby on rails project. Following these instructions on installing the PyCall gem we install the python libraries that we need:
pip install -U pip
pip install -U numpy
pip install -U scipy
pip install -U scikit-learn
pip install -U sklearn-som
After that, we install the PyCall gem:
gem install pycallAnd now that we’ve the dependencies we need, we’ll need to ensure the PyCall gem is required by the project and then include the Pycall::Import module, so that we are able to access the Python import functions. We’ll add the following lines to the config/application.rb:
require 'pycall/import'
include PyCall::Import
Now, we’re ready to begin working on our job. Let’s first start by creating a service called SelfOrganizingMap:
pyfrom :'sklearn_som.som', import: :SOM

class SelfOrganizingMap
  attr_reader :som, :map_state

  def initialize(sample_data, features, options)
    @sample_data = sample_data
    @width = options[:width] || 20
    @height = options[:height] || 20
    @epochs = options[:epochs] || 1
    @shuffle = options[:shuffle] || false
    @som = SOM.new(m: @height, n: @width, dim: features)
  end

  def call!
    pyfrom :numpy, import: :array
    @som.fit(array(@sample_data, dtype: :float), epochs: @epochs, shuffle: @shuffle)
    @map_state = { positions: @som._locations.tolist, values: @som.weights.tolist }

    self
  end
end
Seems pretty straight forward, right? First we import the python library sklearn-som and the python class SOM. The service initialization is pretty much just storing the relevant parameters as class instance variables and initializing our SOM algorithm. For the invocation method, we fit the map with the sample data, using the optional parameters ‘epochs’ and ‘shuffle’.
We can see here one new concept: epochs, which is essentially the number of times the algorithm will go through the training data (our sample data here). The other parameter, ‘shuffle’, indicates if the algorithm goes through the sample data sequentially or randomly.
Another detail that you may notice is the fact that we’re importing the numpy array on the call! method itself. I couldn’t understand why, but I was unable to import it outside the class (like we did with sklearn_som).
We end the service invocation by storing the map state in a class instance variable and returning the service itself.
Now that we’ve the main actor of this project set, we’ll now add the supporting actors: database, jobs and controllers/serializers. Lets start with the database. Add the following migration to our project:
class CreateInitialTables < ActiveRecord::Migration[7.0]
def change
create_table :maps, id: :integer do |t|
t.integer :feature_number
t.integer :width
t.integer :height
t.json :map_state
t.timestamps
end
create_table :sample_data_entries, id: :integer do |t|
t.string :label
t.json :value
t.references :maps, type: :integer, index: true, null: false
t.timestamps
end
end
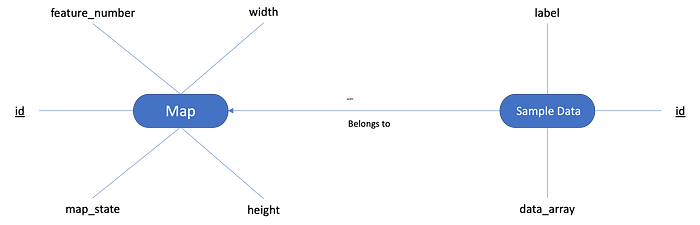
endThe table maps will contain 3 integers with the map characteristics: feature number, width, height, and a json field with the current map state. The table with the sample data entries will contain a string with the label entry, a json value and the reference to the map it belongs to. Run the migration and create the models accordingly:
class Map < ApplicationRecord
  has_many :sample_data_entries, dependent: :destroy
endclass SampleDataEntry < ApplicationRecord
belongs_to :map
endWith the database and the models ready, we’ll now move onto the periodic job we’ll be running. Now we could use a specific job backend like sidekiq or rescue to handle our jobs, including persistence and all that, but, for the sake of simplicity, we’ll use the builtin rails async backend. However, you should use a 3rd party backend service when dealing with real products.
But, since this is only a demonstration, we’ll go through it with the following job:
class RunSelfOrganizingMapJob < ApplicationJob
  queue_as :default

  def perform(map)
    # build sample data
    sample_data = map.sample_data_entries.map do |entry|
      JSON.parse(entry.value)
    end

    # run our map
    map_service = SelfOrganizingMap.new(sample_data, map.feature_number, height: map.height, width: map.width).call!

    # store the map result
    map.update!(map_state: map_service.map_state.to_json)
  end
end
First we read the sample data entries from the database. Since we stored it as a json field, we’ve got to parse it. The assumption here is that the value field will only have arrays. We could add a validation for that model as well.
Following that, we run out map service, using the sample data we loaded and the parameters on the map model.
And finally, we update the latest map state back onto the database as json.
Now that we’ve hour job, we need to schedule it. I’ll be using the gem whenever to simplify the process. Here’s a guide on how to use it. But as usual, you’re free to schedule the job with your favorite method.
We’ll first create our rake file, by running the following like on the terminal:
rails g task jobs execute_somThis will generate for us the file lib/tasks/jobs.rake with a execute_som skeleton prepared. We’ll just run the job we created earlier for each created map:
namespace :jobs do
  desc "runs the SOM algorithm for all maps"
  task execute_som: :environment do
    Map.all.each { |map| RunSelfOrganizingMapJob.perform_later(map) }
  end
end
And then we’ll go to the file config/schedule.rb and add the following to the file:
every 1.hour do
  rake 'jobs:execute_som'
end
So that our rake task (and our jobs) will run at least once every hour. Now we run the following to put the schedule under our crontab:
bundle exec whenever --update-crontabAnd with this, we’re done with our job segment. Now we’ll provide a way for other programs to interact with our system, by adding our controller. We’ll keep it simple and avoid things like authentication and so on:
class SelfOrganizingMapsController < ApplicationController
  def index
    render json: Map.all
  end

  def show
    render json: Map.find(params[:id])
  end

  def create
    map = Map.new(map_params)

    if map.save
      render json: map
    else
      render json: map.errors, status: :bad_request
    end
  end

  def datapoints
    map = Map.find(params[:id])

    results = store_data_points

    if results[0]
      render json: results[1]
    else
      render json: results[1], status: :bad_request
    end
  end

  private

  def map_params
    params.require(:map).permit(:feature_number, :height, :width)
  end

  def data_point_params
    params.require(:datapoints).permit(points: [:label, :value])
  end

  # this would better be going to a service, but to simplify, it'll be a method
  def store_data_points
    points = []

    ActiveRecord::transaction do
      data_point_params[:points].each do |point|
        entry = SampleDataEntry.new(map: map, label: point[:label], value: point[:value])

        entry.save!
        points << entry
      end
    rescue StandardError => e
      return [false, e.message]
    end

    [true, points]
  end
end
Now detailing our controller. First we’ve a simple GET index method, where we just return all the Maps. So, imagine we create a new map in our database and poll that endpoint with a curl request, we’d get the following result:
curl localhost:3000/self_organizing_maps
[{
  "id":1,
  "feature_number":4,
  "width":1,
  "height":3,
  "map_state":"{\"positions\":[[0,0],[1,0],[2,0]],\"values\":[[7.052495536841222,3.096840534079828,5.889542612556274,2.0505904618234125],[6.5551400949659495,2.9844547345216452,5.472842176411454,2.041854603511048],[6.063218349654388,2.8035272117884698,4.961147313745605,1.8118350621619683]]}","created_at":"2023-04-06T13:21:16.386Z","updated_at":"2023-04-06T13:34:58.771Z"
}]%
In this case we’ve a collection with a single object returned with an id value, the feature number, width, height and current state of the map.
Next we’ve the GET show method, for getting a single map entry. We know the ID of the only existing map is one, so we’ll pass it as the route parameter for the request:
curl http://localhost:3000/self_organizing_maps/1
{
  "id":1,
  "feature_number":4,
  "width":1,
  "height":3,
  "map_state":"{\"positions\":[[0,0],[1,0],[2,0]],\"values\":[[7.052495536841222,3.096840534079828,5.889542612556274,2.0505904618234125],[6.5551400949659495,2.9844547345216452,5.472842176411454,2.041854603511048],[6.063218349654388,2.8035272117884698,4.961147313745605,1.8118350621619683]]}","created_at":"2023-04-06T13:21:16.386Z","updated_at":"2023-04-06T13:34:58.771Z"
}%
This time we get a single entry (the one we already saw with the GET index).
And now we get onto the POST create method. We just send the feature number, height and width of the desired map:
curl -H 'Content-Type: application/json'\
     -d '{ "map": { "feature_number": 3, "width": 3, "height": 3 } }'\
     -X POST\
     http://localhost:3000/self_organizing_maps

{
  "id":2,
  "feature_number":3,
  "width":3,
  "height":3,
  "map_state":null,
  "created_at":"2023-04-10T14:51:13.121Z",
  "updated_at":"2023-04-10T14:51:13.121Z"
}%
As we can see here, a new map was created with the parameters we sent. However we can notice the map_state is “null”. But that’s expected since this one was just created and the Job we created before still didn’t had the chance to run. We’re also getting the created_at and updated_at fields, since we haven’t created serializers for the models, so, it’s just returning us everything.
For the final endpoint, we get a PUT method called ‘datapoints’, to which we’re gonna send new testing points, let’s review more closely that part:
...

def datapoints
  map = Map.find(params[:id])

  results = store_data_points

  if results[0]
    render json: results[1]
  else
    render json: results[1], status: :bad_request
  end
end

...

def data_point_params
  params.require(:datapoints).permit(point: [:label, :value])
end

def store_data_points
  points = []

  ActiveRecord::transaction do
    data_point_params[:datapoints].each do |point|
      entry = SampleDataEntry.new(map: map, label: point[:value], value: point[:value])

      entry.save!
      points << entry
    end
  rescue StandardError => e
    return [false, e.message]
  end

  [true, points]
end
First we get out map. Then we run through the store_data_points method, where for each point we receive, we create a new SampleDataEntry, inside of a transaction (so we can have an “all or nothing approach”). If we get an error from having and invalid entry, we rollback the changes, return false and an error message, and render the result with that error message and a Bad Request status. If everything goes smoothly, the method returns a pair with a true value on the first field and the created data points on the second field, which we return together with an OK. Ideally, the content of this method should be done on a service, but this is good enough for our demonstration.
As before, the following curl request exemplifies a request to this endpoint:
curl -X PUT http://localhost:3000/self_organizing_maps/2/datapoints\
     -H 'Content-Type: application/json'\
     -d '{"datapoints":{"points":[{"label": "a", "value": [0.1, 0.1, 0.1]}, {"label": "b", "value": [0.2, 0.2, 0.2]}]}}'

[{
  "id":155,
  "label":"a",
  "value":[0.1,0.1,0.1],
  "map_id":2,
  "created_at":"2023-04-10T15:39:11.973Z",
  "updated_at":"2023-04-10T15:39:11.973Z"
},
{
  "id":156,
  "label":"b",
  "value":[0.2,0.2,0.2],
  "map_id":2,
  "created_at":"2023-04-10T15:39:11.974Z",
  "updated_at":"2023-04-10T15:39:11.974Z"
}]
And if we poll the rails console for the SampleDataEntries for that specific job, we get the following:
irb(main):002:0> SampleDataEntry.where(map_id: 2).count
  SampleDataEntry Count (1.9ms)  SELECT COUNT(*) FROM "sample_data_entries" WHERE "sample_data_entries"."map_id" = ?  [["map_id", 2]]
=> 2
With this, we’ve got our barebones, but working controller, and our server is now ready for usage!
Real Life Usage
We’ve got out Rails Server running SOM completed. But how could we actually use it in real life?
For example, we’ve mentioned before that SOM can be used to detect credit card fraud. Since the sklearn-som has the ability to also predict to which neuron a certain data point, we can extend it to use said method. For that, we’d also need to persist the actual sklearn-som object each time we update it. We could use something like pickle to do that. We’d then reload that serialized object and use it with a predict method.
Other examples are present in this article. The first example is a joke example, trying to figure out the relationships between the characters of “Les Misérables”. The second example is a good real world usage for the SOM: predicting the professional trajectories of a group of people that went through a certain training program.
Previously we said that the SOM could also be used to identify costumer segmentation. And there’re many more usages for this project.
With this server running the SOM algorithm periodically, we can per example, implement a statistics application that provides a periodic mapping for the categories filled above. A manager could see (remember, SOM is mostly a data visualization technique) the relationships between costumers and the acquired products on a visual map generated by a frontend application after requesting the map from the backend.
A recruiter could use the generated map to help identify which candidates provide better expectations for the company. A banker could use it to see if a certain transaction is fraudulent or not. A writer could attempt to balance out the interactions between characters so that no character gets less screen time than it should! The possibilities are only limited by the necessities that exist and by the imagination of who develops the tools.
At least, now you know how to integrate Self-Organizing Maps into a Ruby on Rails application, and make those possibilities a reality!
You can access the source code with the implementation done here.