
Core Data is a framework, provided by Apple, to be used on Applications for iOS and macOS. As Apple states, it is not a database, but instead a persistence framework that commonly uses SQLite to store and retrieve structured data. For programmers, it operates purely on the object level without having to worry about the details of storage and retrieval.
At first the Core Data framework may seem difficult to understand. But the API is intuitive and concise, and once you understand the Core Data stack, it starts to make sense, and you can quickly adapt to it. The most common mistake, is to start using the Core Data without understanding how its pieces fit together and relate to each other.
The Core Data Stack
The Core Data stack handles all of the interactions with the external data store and consists of three primary tools: the Managed Object Model, the Persistent Store Coordinator and the Managed Object Context. It may sounds like a lot of pieces to be used, but since you setup all this parts, you will not need to make much changes, and you will be using mostly only the Managed Object Context.
The Managed Object Model, describes the schema that you will be using in your application. It loads the file into memory, often referred to as “mom”, generated from the .xcdatamodeld of your Xcode project. If the application is unable to find or load the file fails to load it and raises a “Fatal Error”. In Xcode, by selecting this .xcdatamodeld file, you will be able to use the visual editor to define the entities with their attributes and relationships.
The Persistence Coordinator verifies that the data is in a consistent state that matches the definition on the model layer, and is responsible for extracting instances of entities from that data. A common “Fatal Error” a programmer can face is when he makes changes on the Managed Object Model. For example add a new attribute to a entity, and re-run the application with previous stored data. In this situation, you have two options. You can prepare a migration, if you already have your application on the App Store. Or you can just reinstall the application, since it doesn’t make sense to have a migration developed if no one is using your application, and this will not be necessary for anyone other than you.
And finally the Managed Object Context, which is the one that your source code will be interacting with the most, is responsible for managing objects created and returned using Core Data. It operates in-memory, not only for speed, but also to keep your model objects’ attributes updated across your application. For object graph changes that affect multiple objects, it is much faster if they are already in memory, rather than searching for them again in the database. You can modify those objects however you like, and unless you actually save those changes, the persistent store remains unaltered. And by tracking changes, the context is able to provide undo and redo support for you.
Creating a Model layer on the Managed Object Model
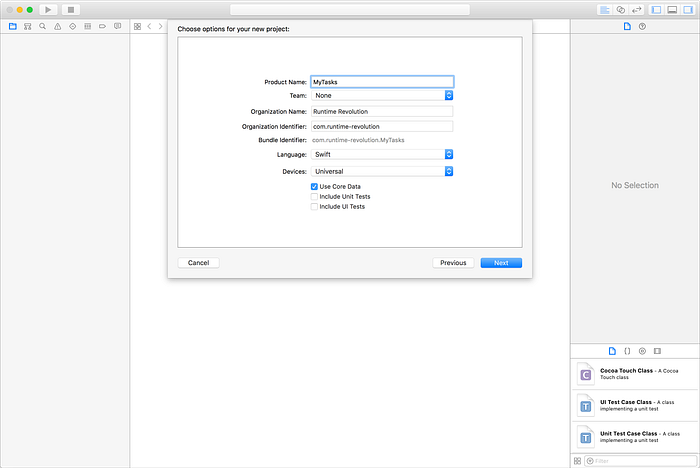
First, let’s start a new project on Xcode (File > New > Project…). From the wizard select the “Single View Application“, and on the next step, enable the option “Use Core Data” and press “Next”, as shown below.
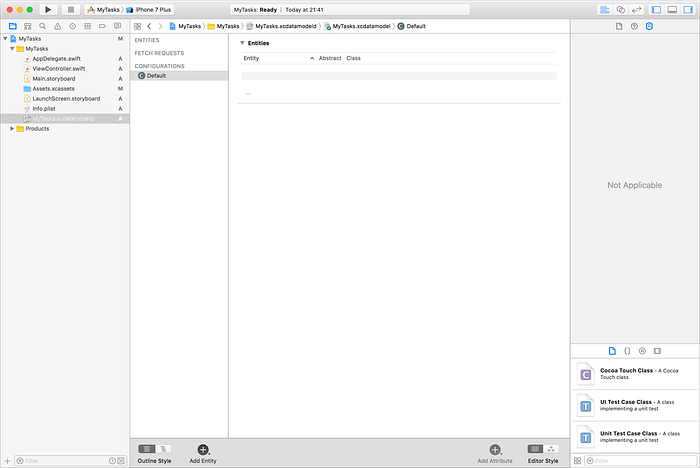
After you create your project, you will find the .xcdatamodeld file, as described before. Go ahead and select that file to open the Xcode Data Model editor as shown below.
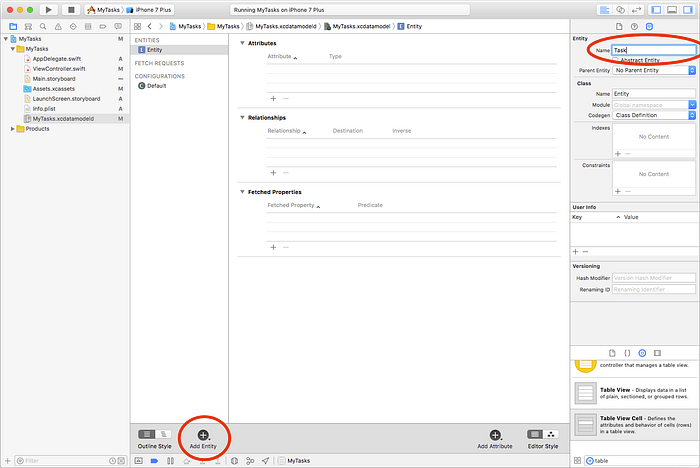
From the bottom option “Add Entity” you can add as many entities\tables your model needs to have. Go ahead and click that option to create a new entity.
By default, Xcode creates an entity with the name “Entity” and without any attributes. You can change the name like you would change a file name on Finder, but you can also use the inspector to perform this change. The inspector is the right bar, if you don’t have it visible go to View > Utilities > Show Data Model Inspector to enable it.
On the image below we will use the inspector to change the name of the entity to “Task”.
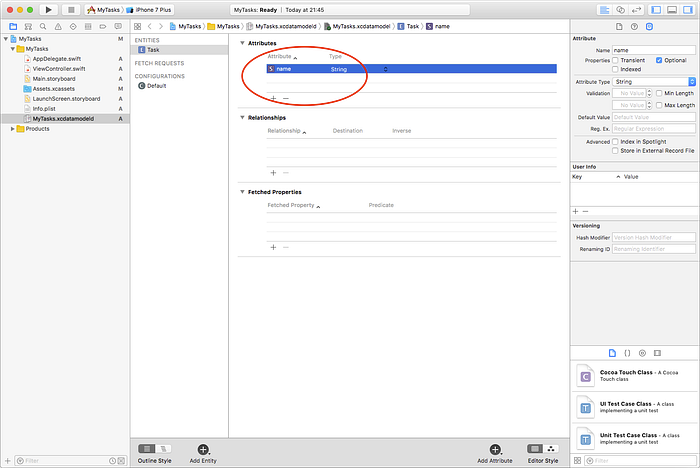
After you press enter, the Class name, below the section Entity, will also be updated with the desired name. Note that the entity name and the class name don’t need to have the same value, but from my experience it is preferable you do so to avoid misunderstandings in the future. After this, go ahead and click the plus (+) sign on the section Attributes to add a new attribute to this entity. In this case, the editor will be expecting you to change the name and select a valid type. If you don’t select a valid type it will keep showing an error. I will change the attribute name to “name” and set the type to “String”. Another note here, there are names with internal conflicts that can’t be used. For example, the name “description” clashes with an internal implementation of the Core Data objects, and cannot be used. After you create this new attribute it should look like the picture below.
Note that we don’t need to create an attribute for a primary key. That is one of the responsabilities of Core Data and it is the framework that will create the logic for your entity internally.
For a better representation and understanding of the Managed Object Model, go ahead and add one more attribute to this entity, named “completed” with type “Boolean”.
Also go ahead and create a new entity named “Note” with one attribute named “text” and type “String”.
After this we want to create a relationship between these two entities, where a task can have multiple notes. To setup this relation, select the entity “Task”, and from the section “Relationships” click on the plus (+) sign to create a new attribute. Then rename that relationship attribute to “notes”. From the “Destination” section select the desired entity “Note”. Now in the Data Model Inspector (Right Bar) change the Relationship Type to “To Many” as shown below.
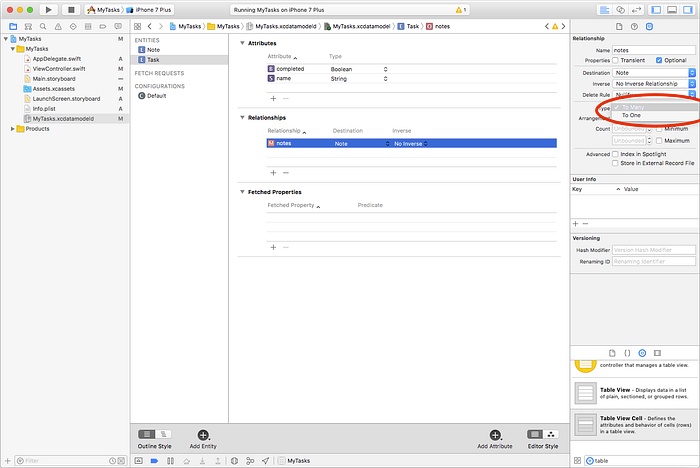
You will notice that a warning appears. This warning alerts you to define an inverse relationship to the entity “Note”. This is not strictly required, but setting the inverse relationship will help Core Data ensure the consistency of the object graph when a change is made.
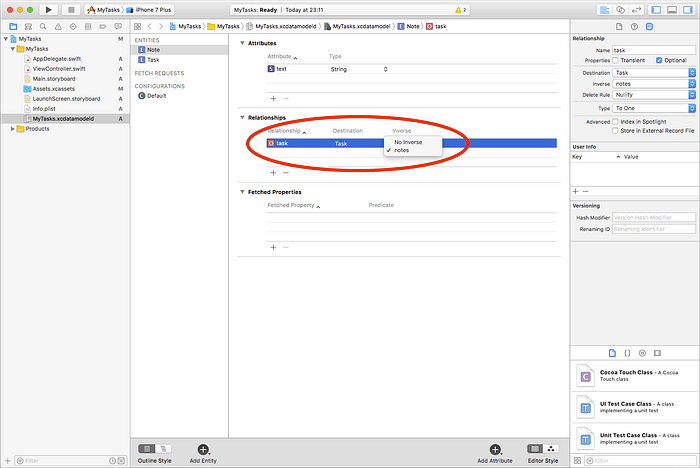
Go ahead and select the entity “Note” and add a new relationship attribute, then rename it to “task”. From the Destination select the entity “Task”. To remove the warning from the column Inverse, select the attribute “notes”. This will also update the relationship attribute on the entity “Task” to “task”. By default the relationship is set as “To One” so you don’t need to change anything on this side. When you’re done it should look like the picture below.
With this, we have setup a basic Managed Object Model with a relationship One-To-Many. Where a “Task” can have multiple “Note” entities, and a “Note” can have one “Task”. You will only need to perform changes if you want to increase the complexity of your stored data, such as adding a new entity or attribute; otherwise, you won’t need to worry about this section any time soon.
Initializing the Persistence Coordinator
In iOS 10, you only need to specify the container name with the same name as your . xcdatamodeld file, which will return the “mom” file from the compiler to the coordinator.
Selecting the AppDelegate.swift file you will find the common used code, inside the class, that initializes the coordinator, like the code below:
Designing a simple User Interface
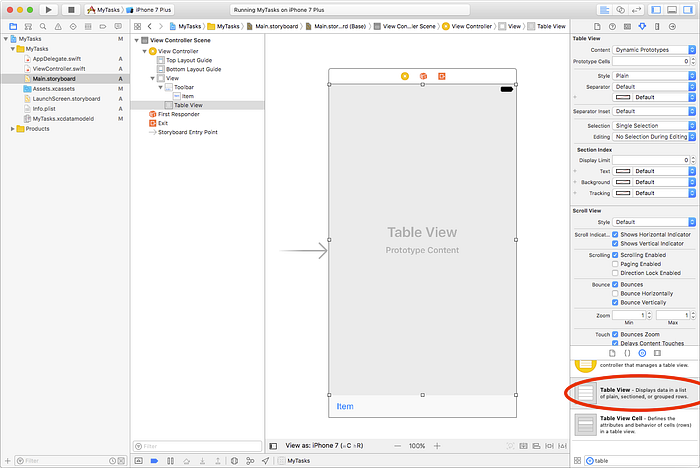
Since the main goal of this article is not related to how we design user interfaces, I will give you a quick setup to support this article. To start, go ahead and select the Main.storyboard. On the Visual Editor drag a “Toolbar” from the inspector and drop it into the controller view. Also drop a “Table View” into the controller view, and resize it to have the same look as shown below. One thing to note here, if you don’t setup the auto layout constraints, you may have some issues regarding the interface layout if you use a device with diferent aspect ratio (On the final code I have included the auto layout constraints).
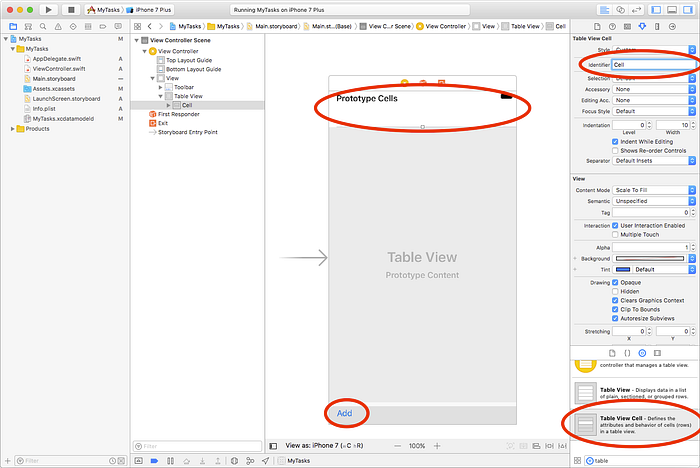
Double tap on the element “Item”, from the bottom Toolbar, and rename it to “Add”. Also drag and drop a “Table View Cell” from the inspector to the Table View. Select the dropped cell, and from the inspector set an Identifier string to this prototype cell, in this case I will use the string “Cell”. It should look like the picture below.
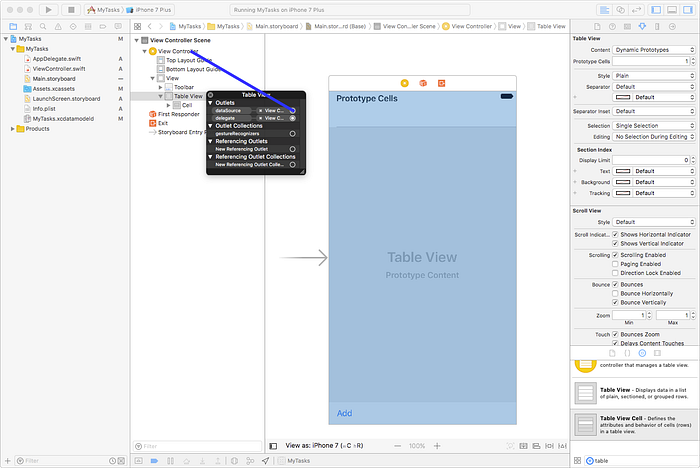
Next, we need to indicate to the Table View which object will be responsible to return objects for it. To do this, right click on the “Table View” object from the “View Controller Scene” hierarchy, and link the dataSource and the delegate to the View Controller, like in the picture below.
Going back to code, add the following instance and method into the ViewController.swift.
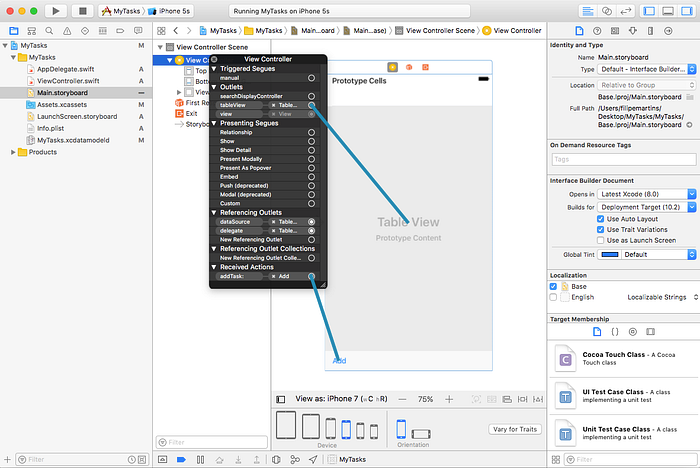
Returning to the Visual Editor, right click on the View Controller object from the View Controller Scene and connect the instance “tableView” to the Table View and the method “addTask:” to the button “Add” on the bottom toolbar. It should look like the picture below.
And with this we have a basic user interface to support this use case for Code Data. I will not extend all user interfaces to fulfill the entire model layer, but you have the idea how to propagate to additional view controllers. Now let’s move to the Managed Object Context to create, update and delete objects!
Using the the Managed Object Context
First let’s import the Core Data framework references to the ViewController.swift as shown below to have access to the functionalities of the Core Data on this class.
Then add to your ViewController.swift a variable that will have the reference to the managed object context. The ViewController.swift should have something like this:
Now let’s move back to the AppDelegate.swift and in the method application:didFinishLaunchingWithOptions: include the following code.
To fetch objects from the database the best aproach, and the solution Apple wants us to use, is the NSFetchedResultsController. Fetched results controllers can fetch efficiently records from a predicate and a sort order. It can also monitor changes to objects in the associated managed object context, and report changes in the result sets to its delegate.
To implement the fetched results controller, let’s create an instance of NSFetchedResultsController, on the ViewController.swift file. After creating it, we will use a var of the same type to access this fetched results controller instance. With this, we will only initialize the controller at the moment that var will be used, similiar to a lazy aproach. The benefits of this are that we guarantee the instance will be initialized at the moment it will be used.
And whenever a change occurs, the fetched results controller will call the method controllerDidChangeContent: from his delegate.
Go ahead, include the method and call the reload data from the table view variable to refresh his data.
Now let’s implement the Table View methods, on the ViewController.swift file, to populate data into it:
- First the Table View will ask how many sections our data contains.
- Then the number of rows for each section.
- And the updated cell for each object.
One thing to note here, after we set the fetched results controller, despite where a change to the Core Data is made, this view controller will react to all changes that may affect the data existent on this fetched results controller that matches the defined filter\predicate.
At this point, if you run the application, you will only see the user interface that we have created before. So, to see some magic happening, let’s go back to the addTask: method, on the ViewController.swift file, and update with the following code.
For editing and deleting, we will implement the optional delegate method the Table View has to offer. Include the following code into the ViewController.swift
The final project can be found on the following link:
filipemsmartins/MyTasksMyTasks - A simple Core Data examplegithub.comIf you have any question or feedback about this article, feel free to leave a comment bellow!
Data persistence is always important for any application. There are so many tools we use for this purpose, but as an iOS Developer, this is one of my favourite, and I use it almost on every project.
I work at Runtime Revolution where I build mobile products for our clients, using this framework and so many others.
Runtime RevolutionWe are Rails, mobile and product development experts. We can build your product or work with you on your project.runtime-revolution.com