Automating the generation of Pull Request descriptions with OpenAI’s chatGPT model.
This blog post and the respective Rails engine were developed in cooperation with Runtime Revolution’s collaborator André Franco.
Pull request descriptions are an important part of the software development workflow, but writing descriptions for pull requests can be a time-consuming and error-prone process, particularly when working on larger projects with many contributors. With the OpenAI’s powerful language models, it is now possible to automate this process and generate high-quality descriptions with ease.
At Runtime Revolution, we took this opportunity to write a Ruby on Rails development plugin (Engine) that can be mounted on a Rails App and provides the developer with a simple interface to automatically send their changes to the chatGPT API, get a response with the PR description, edit it if needed, and use that text to open a new pull request on GitHub or Bitbucket.
In this article, we will show how easy and powerful it is to build and integrate these tools in the developer workflow, thereby streamlining the pull request process.
To integrate with the OpenAI API, developers need to provide their API key from their OpenAI account, which can be obtained by following this link https://platform.openai.com/account . For a fully integrated process, developers need to provide as well a GitHub access token for a project hosted on GitHub, or a Bitbucket App Password and Bitbucket Username for a project hosted on Bitbucket, to allow our engine to create or update pull requests.
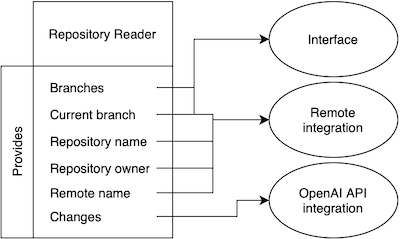
Our engine has three main components: the repository reader, the OpenAI API integration, and the remote integration (GitHub or Bitbucket). The remote integration is optional and does not interfere with the use of the OpenAI API to generate pull request descriptions.
Repository reader
This component acts as the glue between all components of the engine. It has the responsibility to provide the key informations about the project repository details using Git terminal commands on the current project directory.
On the user interface it is used to check if the project has as repository configured and what branches are available to open or update the pull request.
For the OpenAI component, the repository reader is used to retrieve the changes between two branches, cleaning them, and optimizing empty spaces from it.
And for the Remote component it has the responsibility to provide the required repository parameters to be used on the API calls. The parameters required for both GitHub and Bitbucket are: the remote name, the repository owner, the repository name, and the current branch name.
OpenAI Integration
The Open AI Component is responsible to build the message containing the text to ask chatGPT for a pull request description. We try to keep the message short to avoid wasting unnecessary tokens, so we simply ask for a Pull Request description and we include the file changes and the feature type (Feature, Hotfix or Release). This process is nothing more than a simple Request-Response scenario but there are two important parameters present in the request that we should look into, the model and the temperature.
Let’s start by talking about the Temperature and how exactly does it work.
The temperature parameter plays a crucial role in determining the level of randomness in the generated text produced by chatGPT. When the temperature is set to a lower value, the generated text tends to be more focused and conservative. On the other hand, when the temperature is set to a higher value, the generated text tends to be more varied and creative.
A temperature value of 0 indicates that the model will always choose the word with the highest probability, resulting in less variation in the generated text. When the temperature is higher, the model may select words with slightly lower probabilities, which increases the randomness and creativity of the generated text. However, setting the temperature too high can lead to “hallucination,” where the model selects words that are irrelevant or nonsensical.
For our situation: writing user-friendly text, it is recommended to set the temperature around 0.6, which is a good balance between randomness and focus.
Here’s an example of a pull request description for a hotfix in which we changed a navbar to have 100% width. We will be using an extremely low temperature and a high temperature:
temperature 0.1
Suggested description:
This hotfix pull request addresses an issue with the navbar.css file where the width was not set to 100%. This caused the navbar to not display properly on certain screen sizes. With this fix, the navbar will now display correctly and be fully responsive. Thank you for your attention to this matter.
temperature 1
Suggested description:
This hotfix pull request addresses an issue where the navbar on our website was not displaying correctly. The width of the navbar was previously set to a fixed value, causing it to appear misaligned on certain screen sizes.
In this pull request, the width of the navbar is changed to 100%, ensuring that it will always fit correctly on any screen. This small but essential change ensures that our website will provide a consistent and error-free browsing experience for our users.
Please review and merge this pull request as soon as possible to avoid any further issues with our website’s navigation. Thank you for your attention to this matter.
It’s noticeable how straightforward and direct the response was in the first situation, compared to the second example in which the response was way more structured and creative.
In the end, it’s up to the developer to decide which approach suits him the most and how much he wants the chatbot to infer and guess about the changes made.
When requesting a generated response, we have the option to choose the model, which refers to the AI that powers chatGPT. The models differ in terms of accuracy, speed, and cost, so it’s important to select the one that best suits our needs. The cost is measured in tokens, which are fragments of text such as “write” or “poe,” and each language model has its own vocabulary of tokens and token limits that we should consider when choosing a model.
There are several available models to choose from. The GPT-3 models are instructive and designed for generating text with clear instructions, rather than for conversational chat. They are often used for text completion and editing. The GPT-3.5 models (chatGPT) are built on top of the GPT-3 models and optimised for conversational chat. The GPT-4 models are multimodal, meaning they can accept both text and image inputs, and they allow for larger input than the previous models, they can solve much more complex problems, but all this at a higher cost.
After experimenting with a couple of models, we realised that for our specific task which is to quickly build a detailed pull request description, the models that displayed the best results at a lower price were the conversational models such as the gpt-3.5-turbo that we are using as default in our engine. It doesn’t take more than 10 seconds to generate the description, and it generates it in a human-like style while correctly deducing what were we trying to achieve with that pull request.
Completion models like text-davinci-003 don’t seem to have the same high accuracy since their priority is to complete the message we are sending, sometime fabricating information that isn’t there. For example, using the same hotfix example we used for temperatures:
Suggested description:
max-width: 930px
This pull request resolves an issue with a display issue on the navbar. The max-width of the navbar has been increased to 930px, and the width has been set to 100%. This should solve the display issue and resolve the navbar appearing too small.
In our code changes, we never mention anything about the width being 930px, the text bot just fabricated that to try and complete our prompt. The conversational models won’t attempt something like this, they will keep straight to the facts and what’s present in the code changes.
Remote Integration
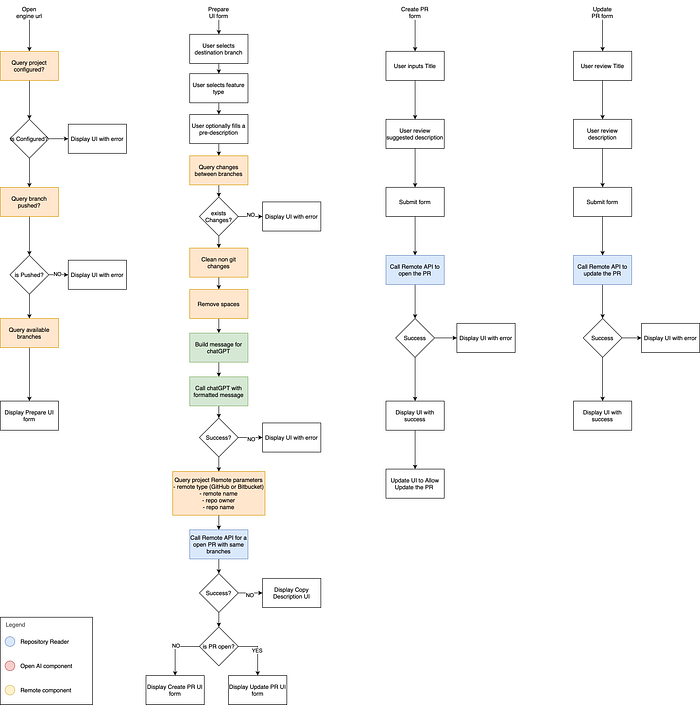
Finally, the optional remote integration component of our engine is the piece that will be responsible for making API calls to GitHub or Bitbucket depending what you use on your project. Our engine after receiving the response from chatGPT, uses this component to determine if there is an existing pull request on the current branch to the selected base, and what information it already have.
This information is used to adapt the interface to the developer’s needs. If a pull request has not yet been created, the developer will be presented with a form to review and edit the suggested description before submitting it through the API.
If a pull request already exists, the developer will be presented with a more complex view that includes information about the existing pull request and the suggested description from chatGPT. This allows the developer to edit the existing description with additional details provided by chatGPT.
Conclusion
In conclusion, automating the generation of pull request descriptions with OpenAI’s chatGPT model can save developers time and increase productivity. Our Ruby on Rails engine provides an easy-to-use and seamless integration with the OpenAI API and GitHub API, making the pull request process more efficient and straightforward.
Engine Architecture
How to use our engine
To configure our engine in your project we suggest to add our gem into your development group of your Gemfile:
gem 'pull_request_ai'Then you need to mount our engine in your routes:
mount PullRequestAi::Engine => ''And finally you provide the keys. There is two aways to do it, the easy would be to have the following environment variables with their respective value (like amazon gems):
# Required
OPENAI_API_KEY="Your OpenAI API Key"

# Optional and only for projects hosted on Bitbucket
BITBUCKET_APP_PASSWORD="Your Bitbucket App Password"
BITBUCKET_USERNAME="Your Bitbucket Username"

# Optional and only for projects hosted on GitHub
GITHUB_ACCESS_TOKEN="Your GitHub Access Token"
Or you can be more specific using the engine initializer:
PullRequestAi.configure do |config|
  # Required
  config.openai_api_key = 'Your OpenAI API Key'

  # Optional and only for projects hosted on Bitbucket
  config.bitbucket_app_password = 'Your Bitbucket App Password'
  config.bitbucket_username = 'Your Bitbucket Username'

  # Optional and only for projects hosted on GitHub
  config.github_access_token = 'Your GitHub Access Token'

  # Extra configurations and their respective default values
  config.openai_api_endpoint = 'https://api.openai.com'
  config.github_api_endpoint = 'https://api.github.com'
  config.bitbucket_api_endpoint = 'https://api.bitbucket.org'
  config.http_timeout = 60
  config.temperature = 0.6
  config.model = 'gpt-3.5-turbo'
end
To access the engine interface you open:
http://127.0.0.1:3000/rrtools/pull_request_aiConfiguration details
- open_api_key — Your OpenAI API Key.
- bitbucket_app_password — A App Password generated on Bitbucket to authenticate your account.
- bitbucket_username — Your current Bitbucket Username to authenticate your account.
- github_access_token — A Access Token generated on GitHub to authenticate your account.
- openai_api_endpoint — The url for the OpenAI API calls, by default is set to ‘https://api.openai.com'.
- github_api_endpoint — The url for the GitHub API calls, by default is set to ‘https://api.github.com'.
- bitbucket_api_endpoint — The url for the Bitbucket API calls, by default is set to ‘https://api.bitbucket.org’.
- http_timeout — The amount of time until timeout any request, by default is set to 60 seconds.
- temperature — The temperature used on the OpenAI API calls, by default is set to 0.6.
- model — The model used on the OpenAI API calls, by default is set to ‘gpt-3.5-turbo’.