
Have you ever found yourself needing to analyze your backend data while working on a Django project? It can be a tedious task, often involving diving into SQL tables and crafting complex queries.
Imagine simplifying this process by “chatting” with your data directly within Django Admin. With PandasAI, you harness the power of large language models (LLMs) to ask natural language questions and get instant insights, making data analysis intuitive and efficient.
In this article, I guide you through integrating PandasAI with Django, transforming how you interact with your project’s data. You can find the complete source code for this project in this GitHub repository, which will help you follow along with the steps outlined in this guide.
What Is PandasAI?
PandasAI is a Python library built on top of the popular pandas library that enables users to perform various data related tasks, such as natural language querying, data visualization and data cleaning.
We’ll focus on its natural language querying capabilities, which involve using LLMs to translate natural language questions into Python code or SQL queries to obtain immediate insights from the data.
Setting Up The Chats App
To introduce a chatbot feature within Django Admin, we first need to create an app dedicated to managing chat sessions and individual messages, which we’ll call chats. This setup involves creating models, configuring the agent and its components, implementing services and views, and finally customizing the admin interface.
Models
The core of the chats app lies in its models. The Chat model represents a chat session and is linked to an admin user. Each chat session can include multiple messages, which are managed by the Message model. Messages can be sent by either the user or the chatbot agent.
Additionally, we have the QueryableModel. By extending this abstract model, any Django model becomes queryable, making its data accessible for natural language queries processed by PandasAI. You can optionally add descriptions for the model and its fields, which PandasAI uses to determine the most relevant data when answering questions. While optional, these descriptions significantly enhance response quality.
from typing import Dict

from django.contrib.auth.models import User
from django.core.exceptions import ValidationError
from django.db import models
from django.utils.translation import gettext_lazy as _


class Chat(models.Model):

    user = models.ForeignKey(User, on_delete=models.CASCADE, related_name="chats")

    created_at = models.DateTimeField(auto_now_add=True)
    updated_at = models.DateTimeField(auto_now=True)

    def clean(self):
        if not self.user.is_staff:
            raise ValidationError(_("Only admin users can create chats."))

    class Meta:
        verbose_name = _("chat")
        verbose_name_plural = _("chats")


class Message(models.Model):

    class Sender(models.TextChoices):
        AGENT = "AGENT", _("Agent")
        USER = "USER", _("User")

    chat = models.ForeignKey(Chat, on_delete=models.CASCADE, related_name="messages")
    sender = models.CharField(max_length=5, choices=Sender)
    content = models.TextField()

    created_at = models.DateTimeField(auto_now_add=True)
    updated_at = models.DateTimeField(auto_now=True)

    def save(self, *args, **kwargs):
        self.chat.updated_at = self.updated_at
        self.chat.save(update_fields=["updated_at"])
        super().save(*args, **kwargs)

    class Meta:
        verbose_name = _("message")
        verbose_name_plural = _("messages")


class QueryableModel(models.Model):

    description: str = None
    field_descriptions: Dict[str, str] = None

    class Meta:
        abstract = True
Agent
The agent module in the chats app configures a PandasAI agent that integrates with our Django backend. At its core is the Agent class, which extends the PandasAI Agent class. This Agent is initialized with data connectors and configuration settings, including a custom HTML response parser, preparing it to interact with the backend data.
Connectors play a crucial role here. They link PandasAI with the backend database, enabling it to fetch data from models marked as queryable. Each QueryableModel in the Django app gets a corresponding connector, ensuring PandasAI effectively retrieves and interacts with the relevant data.
from pandasai import Agent as PandasAIAgent

from .config import get_config
from .connectors import get_connectors


class Agent(PandasAIAgent):

    def __init__(self):
        super().__init__(
            dfs=get_connectors(),
            config=get_config(),
        )
Services
Two services manage the app’s business logic. The ChatService handles sending messages within a chat and generating responses from the agent. Meanwhile, the UserService manages user-specific operations, in this case, retrieving the latest chat session or creating a new one when necessary.
from django.contrib.auth.models import User
from django.db import transaction

from .agent import Agent
from .models import Chat, Message


class ChatService:

    def __init__(self, chat: Chat):
        self.chat = chat
        self.agent = Agent()

    def send_message(self, content: str) -> Message:
        with transaction.atomic():
            Message.objects.create(chat=self.chat, content=content, sender=Message.Sender.USER)

            try:
                output = self.agent.chat(content)
            except Exception as e:
                output = f"There was problem generating an answer: {str(e)}"

            return Message.objects.create(chat=self.chat, content=output, sender=Message.Sender.AGENT)


class UserService:

    def __init__(self, user: User):
        self.user = user

    def get_latest_or_create_chat(self) -> Chat:
        latest_chat = Chat.objects.filter(user=self.user).order_by("-created_at").first()

        if latest_chat is None or latest_chat.messages.exists():
            return Chat.objects.create(user=self.user)

        return latest_chat
Views
The app’s views are encapsulated in the ChatView class, a class-based view that facilitates chat interactions. This view requires admin access and processes POST requests to send messages. It initializes the ChatService for the relevant chat session and uses it to exchange messages.
from django.contrib.admin.views.decorators import staff_member_required
from django.core.exceptions import ObjectDoesNotExist
from django.http import (
    HttpRequest,
    HttpResponse,
    HttpResponseBadRequest,
    HttpResponseNotFound,
    JsonResponse,
)
from django.utils.decorators import method_decorator
from django.views.generic import View

from .models import Chat
from .services import ChatService


class ChatView(View):

    @method_decorator(staff_member_required)
    def dispatch(self, request: HttpRequest, *args, **kwargs) -> HttpResponse:
        return super().dispatch(request, *args, **kwargs)

    def post(self, request: HttpRequest, id: int) -> HttpResponse:
        try:
            chat = Chat.objects.get(id=id, user=request.user)
        except ObjectDoesNotExist:
            return HttpResponseNotFound()
        except ValueError:
            return HttpResponseBadRequest()

        content = request.POST.get("content")

        service = ChatService(chat)
        message = service.send_message(content)

        return JsonResponse({"output": message.content})
Admin
In the admin interface, the ChatAdmin class customizes the admin view for managing chats. It uses a custom change form template that replicates the interface of AI chatbots for a better user experience. Additionally, it restricts the view to display only the current user’s chats, to prevent users from seeing each others’ chats.
from typing import Any, Dict

from django.contrib import admin
from django.contrib.admin.utils import quote
from django.http import HttpRequest, HttpResponseRedirect
from django.urls import reverse

from .models import Chat
from .services import UserService


@admin.register(Chat)
class ChatAdmin(admin.ModelAdmin):

    list_display = ["user", "created_at", "updated_at"]
    change_form_template = "admin/chat/chat_form.html"

    def get_queryset(self, request: HttpRequest):
        qs = super().get_queryset(request).filter(user=request.user)
        return qs.prefetch_related("messages")

    def add_view(self, request: HttpRequest, form_url: str = "", extra_context: Dict[str, Any] = None):
        service = UserService(request.user)
        chat = service.get_latest_or_create_chat()

        obj_url = reverse(
            "admin:%s_%s_change" % (self.opts.app_label, self.opts.model_name),
            args=(quote(chat.pk),),
            current_app=self.admin_site.name,
        )
        return HttpResponseRedirect(obj_url)
Demonstration
To demonstrate the practical application of the chats app, we created a new Django app called movies. This app utilizes data from the wykonos/movies dataset available on Hugging Face.
Setting Up the Movies App
The movies app includes models representing various entities: Movies, Genres, Languages, Companies, Keywords and Contributors. All these models were marked as queryable, by extending the QueryableModel.
For an easier data import process, we created a migration file that automatically downloads the dataset from Hugging Face, parses the CSV file, and populates the corresponding models in the database. For simplicity reasons, we are only using 1000 movie records from the dataset.
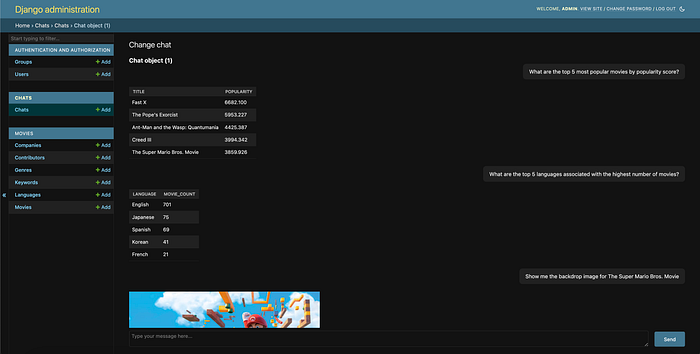
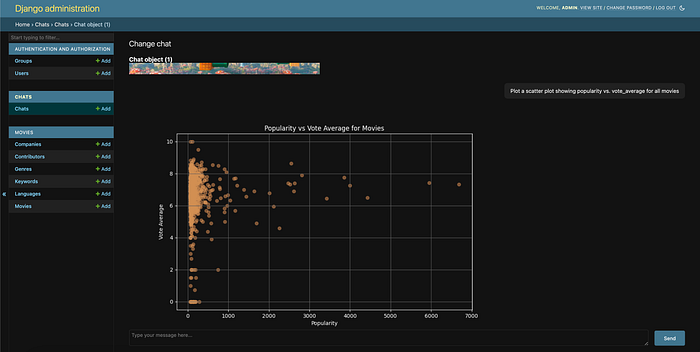
Interacting with Data
To chat with the data, we must access the Django Admin interface and create a new chat session. Once the chat is created, we can ask questions about our data. While no SQL knowledge is required, it is important to be familiar with the structure of the data (i.e., models and fields) and its contents to formulate adequate questions.
Below are some example questions and responses provided by the agent.
Wrapping up
Integrating a chatbot feature into Django Admin using PandasAI simplifies backend data interaction. However, there are a few limitations and things to keep in mind.
One notable limitation of the solution presented is that the agent currently lacks context for past messages within a chat session, meaning that there is no possibility of asking follow-up questions yet. PandasAI offers this feature, but in the scope of this project, it was not included.
Additionally, it’s important to acknowledge that the agent might not always produce satisfactory answers. Factors such as ambiguous queries or data complexity impact the agent’s performance.
Overall, this project serves as a foundation for further enhancements, providing a solution for querying and visualizing data directly within Django Admin.